


Author
Alex Wiersma
Date
6 September 2022
On the Android platform, widgets have been there for ages. Widgets on Android are interactive mini-apps or extensions of a larger app. For example, you can display the weather overview, a mini music player on the phone’s home page, or an interactive background.
With iOS 14, Apple finally introduced widgets to their platform. However, unlike Android, the devices on iOS are static and will only display relevant information to the user. There is no kind of interaction, animation, or input.
As stated on the Apple website, widgets display glanceable relevant information from an app. Widgets allow users to open the related app for more details quickly. An app can provide multiple customizable widgets with each their unique look, layout, and information. For example, you can display the latest news in a list or display a calendar, but interactive mini-apps, such as a media player, are not supported.
Overall, a widget can add to your overall app experience, hopefully triggering users to open your app more often.
This blog post goes into the basic setup of a widget on iOS.
Basic Setup
We first need to build a super simple news app to get started. In this case, it will be a list of news items retrieved from NewsAPI.org. The final result will be a news list displayed in a widget. Code will be shared between the widget and the real app.
1. Create a simple app to get started
Boot up Xcode and create an App project. Make sure SwiftUI is enabled.
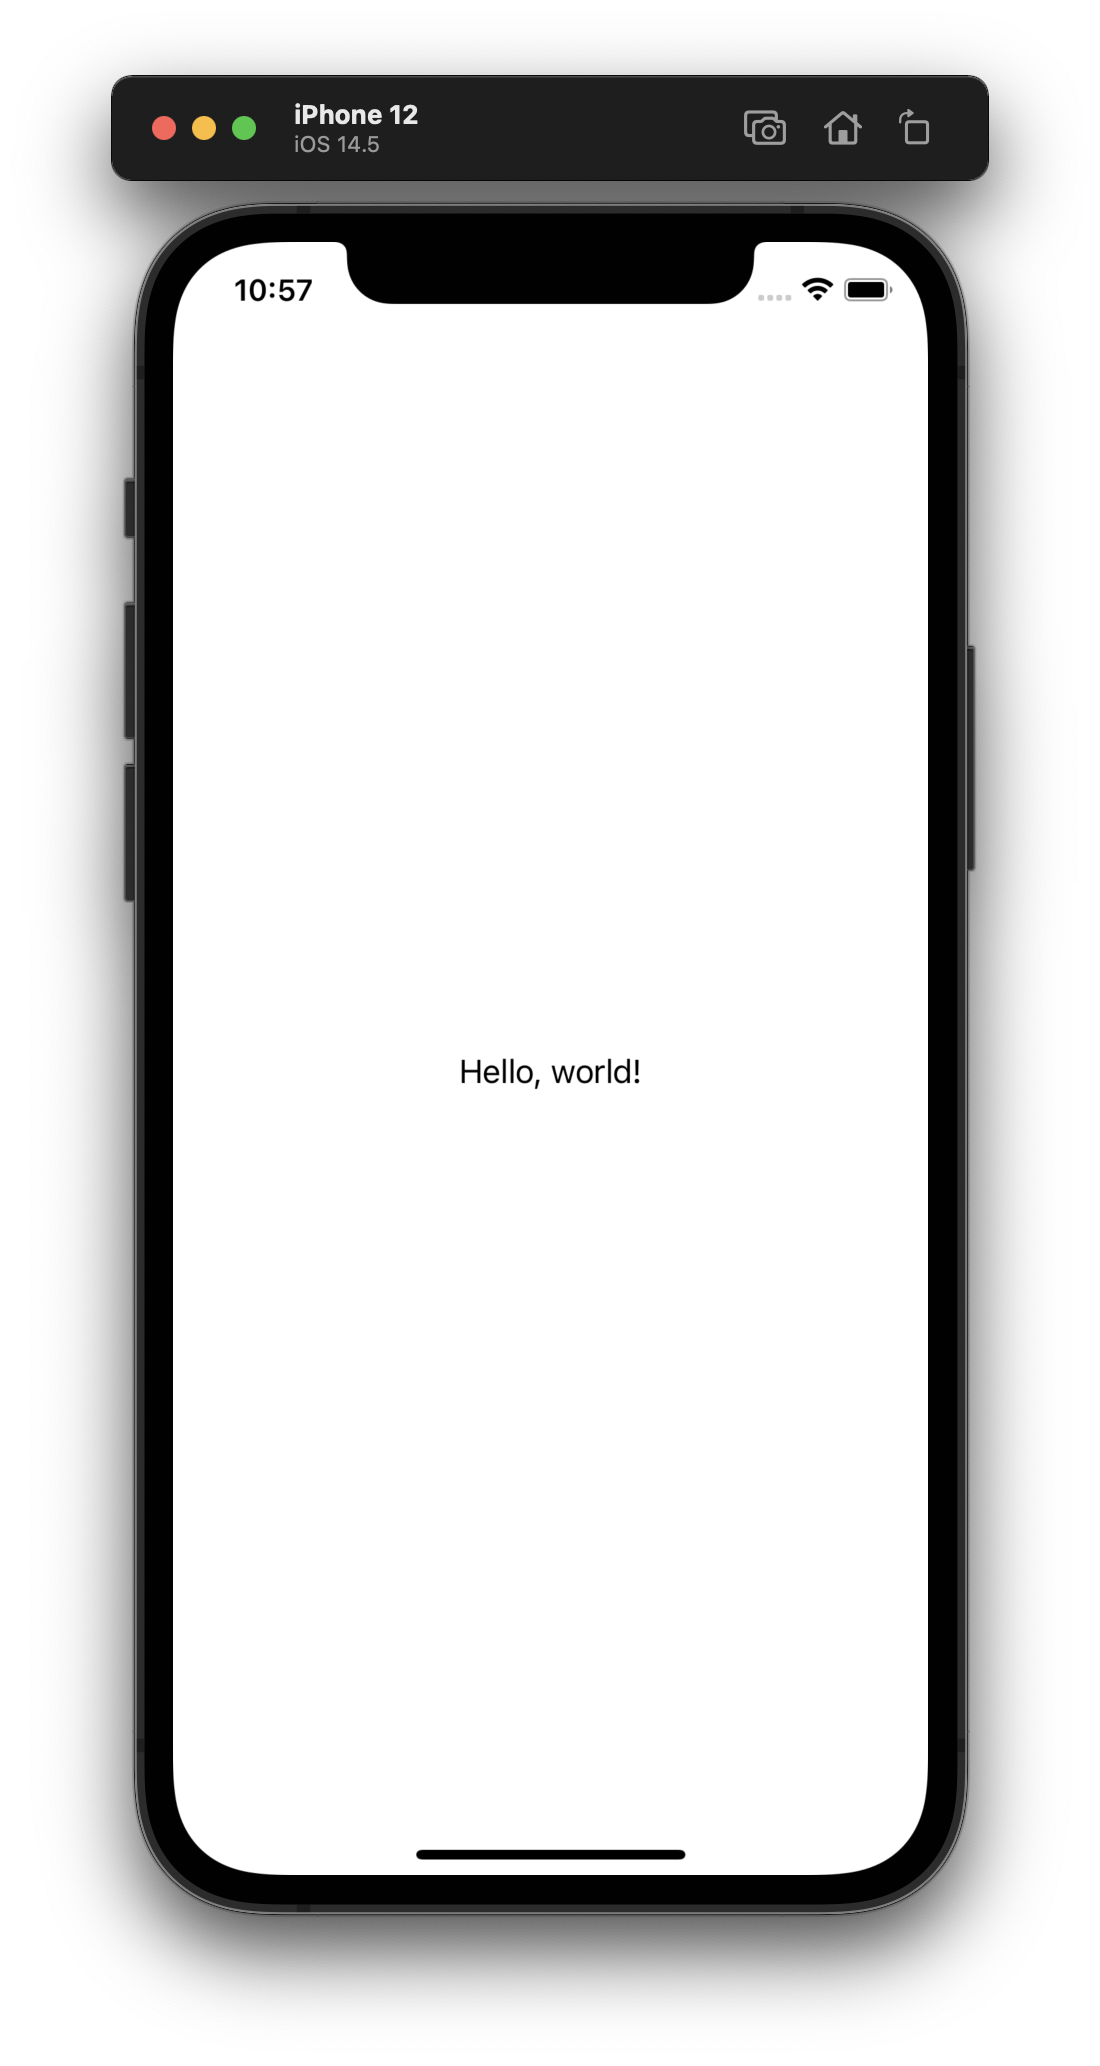
If you run this app, it will display a content view with “Hello world” in it.

2. Create an Account on NewsAPI.org
In order to create the datasets and retrieve the data, we need an account on NewsAPI.org. So visit the website, create an account and get the API key.
3. Setup the dataset
On NewsAPI.org, take note of the following JSON:
``json
{
  "status": "ok",
  "totalResults": 24,
  "articles": [
    {
      "source": {
        "id": "the-wall-street-journal",
        "name": "The Wall Street Journal"
      },
      "author": "Jean Eaglesham",
      "title": "Climate Promises by Businesses Face New Scrutiny",
      "description": "Emissions pledges from U.N. Glasgow conference will be closely watched",
      "url": "https://www.wsj.com/articles/climate-promises-by-businesses-face-new-scrutiny-11636104600?mod=hp_lead_pos2",
      "urlToImage": "https://images.wsj.net/im-429222/social",
      "publishedAt": "2021-11-05T09:30:00Z",
      "content": "The United Nations conference on climate change in Glasgow has been full of promises by companies to reduce their carbon emissions. How many will live up to them and how will anyone know if they are … [+333 chars]"
    },
    {
      "source": {
        "id": "the-wall-street-journal",
        "name": "The Wall Street Journal"
      },
      "author": "Jean Eaglesham",
      "title": "Climate Promises by Businesses Face New Scrutiny",
      "description": "Emissions pledges from U.N. Glasgow conference will be closely watched",
      "url": "https://www.wsj.com/articles/climate-promises-by-businesses-face-new-scrutiny-11636104600?mod=hp_lead_pos2",
      "urlToImage": "https://images.wsj.net/im-429222/social",
      "publishedAt": "2021-11-05T09:30:00Z",
      "content": "The United Nations conference on climate change in Glasgow has been full of promises by companies to reduce their carbon emissions. How many will live up to them and how will anyone know if they are … [+333 chars]"
    }
    ]
  }
```

Basically NewsAPI will return a list of articles containing the following:

– A status
– Number results
– The articles

This can all be mapped to a struct. So create the following file and fill in the following:
```swift
struct NewsArticleList: Codable {
    var status: String
    var totalResults: Int
    var articles: [NewsArticle]
}
```
By complying to Codable, this makes it possible for the JSONDecoder to map the JSON to the struct later on when using the API Service.
Of course this also means we need to map the articles to a struct. The articles array inside of the list, have the following JSON.
```json
{
  "source": {
    "id": "the-wall-street-journal",
    "name": "The Wall Street Journal"
  },
  "author": "Jean Eaglesham",
  "title": "Climate Promises by Businesses Face New Scrutiny",
  "description": "Emissions pledges from U.N. Glasgow conference will be closely watched",
  "url": "https://www.wsj.com/articles/climate-promises-by-businesses-face-new-scrutiny-11636104600?mod=hp_lead_pos2",
  "urlToImage": "https://images.wsj.net/im-429222/social",
  "publishedAt": "2021-11-05T09:30:00Z",
  "content": "The United Nations conference on climate change in Glasgow has been full of promises by companies to reduce their carbon emissions. How many will live up to them and how will anyone know if they are … [+333 chars]"
}
```
This can all be mapped to a struct. To create the following file and fill in the following:
```swift
struct NewsArticle: Codable {
    var author: String?
    var title: String
    var description: String?
    var url: String?
    var urlToImage: String?
    var content: String?
    var publishedAt: String?
}extension NewsArticle: Identifiable {
    var id: String {
        return title
    }
}
```
The Identifiable protocol is needed for the list view, we will be using the title as an ID for now.
API service
In order to retrieve the data from News API, we need a simple API service which will retrieve the JSON and convert it to a Codable Dataset. So create the following:
```swift
final class APIService {
    enum APIError: Error {
        case unknownError
    }

    func getObject<T: Codable>(object: T.Type, url: URL) -> AnyPublisher<T, Error> {
        return URLSession.shared.dataTaskPublisher(for: url)
                .tryMap { (data, response) -> Data in
                    guard let httpResponse = response as? HTTPURLResponse else {
                        throw APIError.unknownError
                    }
                    guard 200...299 ~= httpResponse.statusCode else {
                        throw URLError(URLError.Code(rawValue: httpResponse.statusCode), userInfo: httpResponse.allHeaderFields as? [String: Any] ?? [:] )
                    }
                    return data
                }
                .decode(type: T.self, decoder: JSONDecoder())
                .eraseToAnyPublisher()
    }
}
```
In general, this simple class will try to retrieve the data and convert it to our Codable models.
The architecture and setup of the news app
For this example, we will be using a simple MVVM architecture with some Redux properties. For that, we create a view model for retrieving the data from News API with an observable state, which will contain the data.
So add a new file to the project and name it view model and fill in the following code:
```swift
import Combine

final class ViewModel: ObservableObject {

    // MARK: - Constants
    private enum Constants {
      static let endpointString = "https://newsapi.org/v2/top-headlines?country=us&sortBy=publishedAt"
      static let apiKey = "<YOUR API KEY>"
    }

    enum Category: String {
       case general
       case business
       case entertainment
       case health
       case science
       case sports
       case technology
   }

    // MARK: - state
    enum ResultState {
        case loading
        case error(Error)
        case success([NewsArticle])
    }

    // MARK: - properties
    private var cancelables: Set<AnyCancellable> = Set<AnyCancellable>()
    private let apiService: APIService

    @Published var state: ResultState = .loading

    init(apiService: APIService = APIService() ) {
        self.apiService = apiService
    }

    func getDataIfNeeded(category: Category = .general) {
         guard let url = getUrlForCategory(category: category) else {
             completion?(.failure(APIService.APIError.unknownError))
             return
         }

         state = .loading
         apiService.getObject(object: NewsArticleList.self, url: url)
             .subscribe(on: DispatchQueue.global(qos: .background))
             .receive(on: DispatchQueue.main)
             .sink { [weak self] result in
                 switch result {
                 case .failure(let error):
                     self?.state = .error(error)
                     completion?(.failure(error))
                 default: break
                 }

             } receiveValue: { [weak self] list in
                 self?.state = .success(list.articles)
             }.store(in: &cancelables)
     }

     private func getUrlForCategory(category: Category = .general) -> URL? {
          var urlComponents = URLComponents(string: Constants.endpointString)
          var queryItems = urlComponents?.queryItems
          queryItems?.append(URLQueryItem(name: "category", value: category.rawValue))
          queryItems?.append(URLQueryItem(name: "apiKey", value: Constants.apiKey))
          urlComponents?.queryItems = queryItems

          return urlComponents?.url
     }

}
```
In this class, we have an observable state, in which a subscriber can figure out which state ViewModel is in.
The Constants enum will contain one of the example URLs of NewsAPI.org and uses categories for filtering.
Please make sure to fill in your API key into the Constants enum before running this code.
ViewModel will have different observable states. This can be `loading` in which case it tries to retrieve the data. Or it can be success, in which case the ViewModel has retrieved a dataset, or it can have the error state.
When using this class and calling the getDataIfNeeded method, the ViewModel will automatically retrieve the JSON from NewsAPI.org and convert it to `NewsArticle`-models. These models can then be used to populate the view.
The getDataIfNeeded method also has functionality for filtering based on category.
In order to use this class, the view needs to have ViewModel as an observable object and the view needs to call the getDataIfNeeded() method upon viewAppear or on pull-to-refresh.
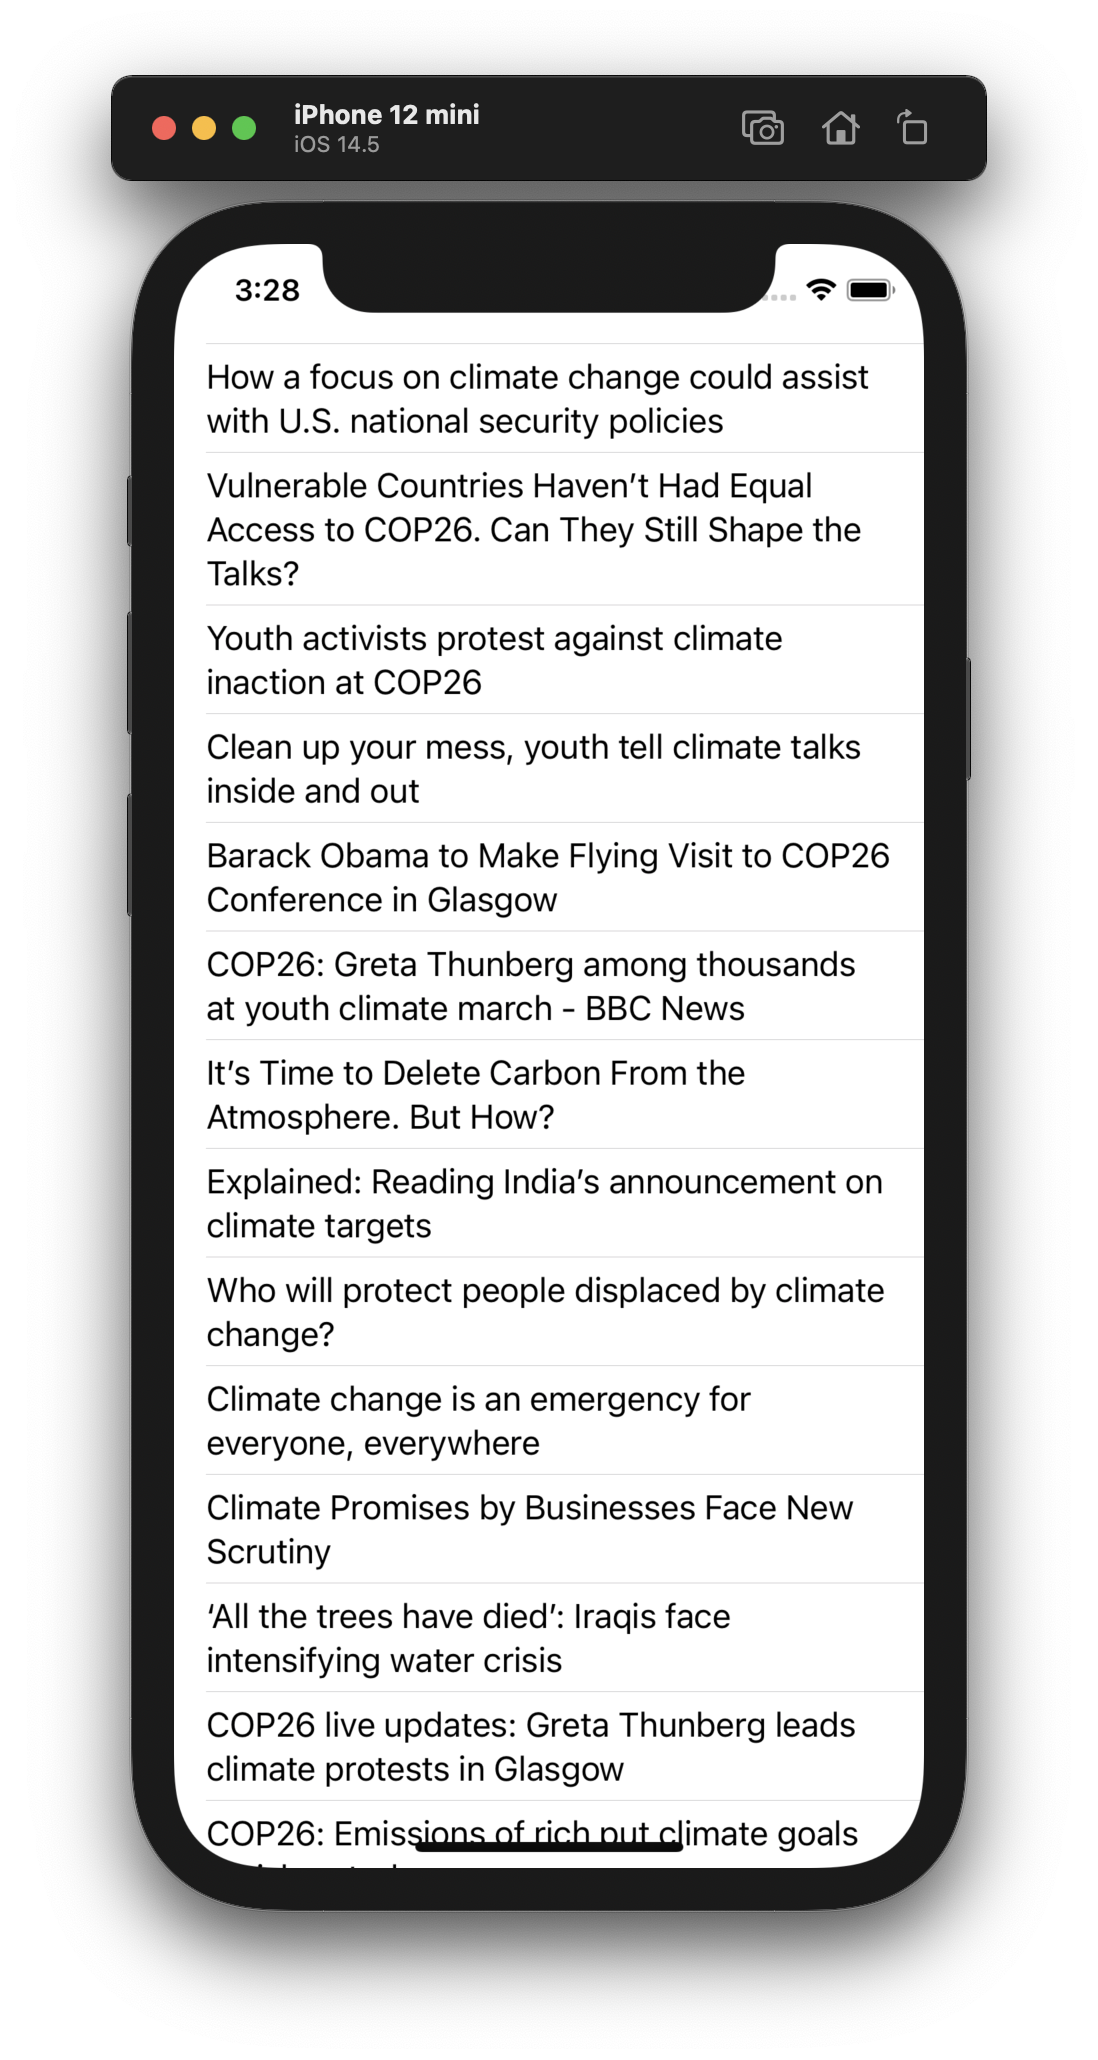
Modify the ContentView to the following code:
```swift
import SwiftUI

struct ContentView: View {

    @ObservedObject var viewModel = ViewModel()

    var body: some View {
        GeometryReader { geometry in

            switch viewModel.state {
            case .loading:
                Text("Loading...")
                    .frame(width: geometry.size.width, height: geometry.size.height, alignment: .center)
            case .success(let result):
                List(result) { item in
                    Text(item.title)
                }
            case .error:
                Text("Error occured!")
                    .frame(width: geometry.size.width, height: geometry.size.height, alignment: .center)
            }

            }.onAppear {
                viewModel.reloadIfNeeded()
            }
    }
}

struct ContentView_Previews: PreviewProvider {
    static var previews: some View {
        ContentView()
    }
}
```
Setup of the Widget
If everything went well and the News app is displaying a list of NewsArticles it is time to add the widget.
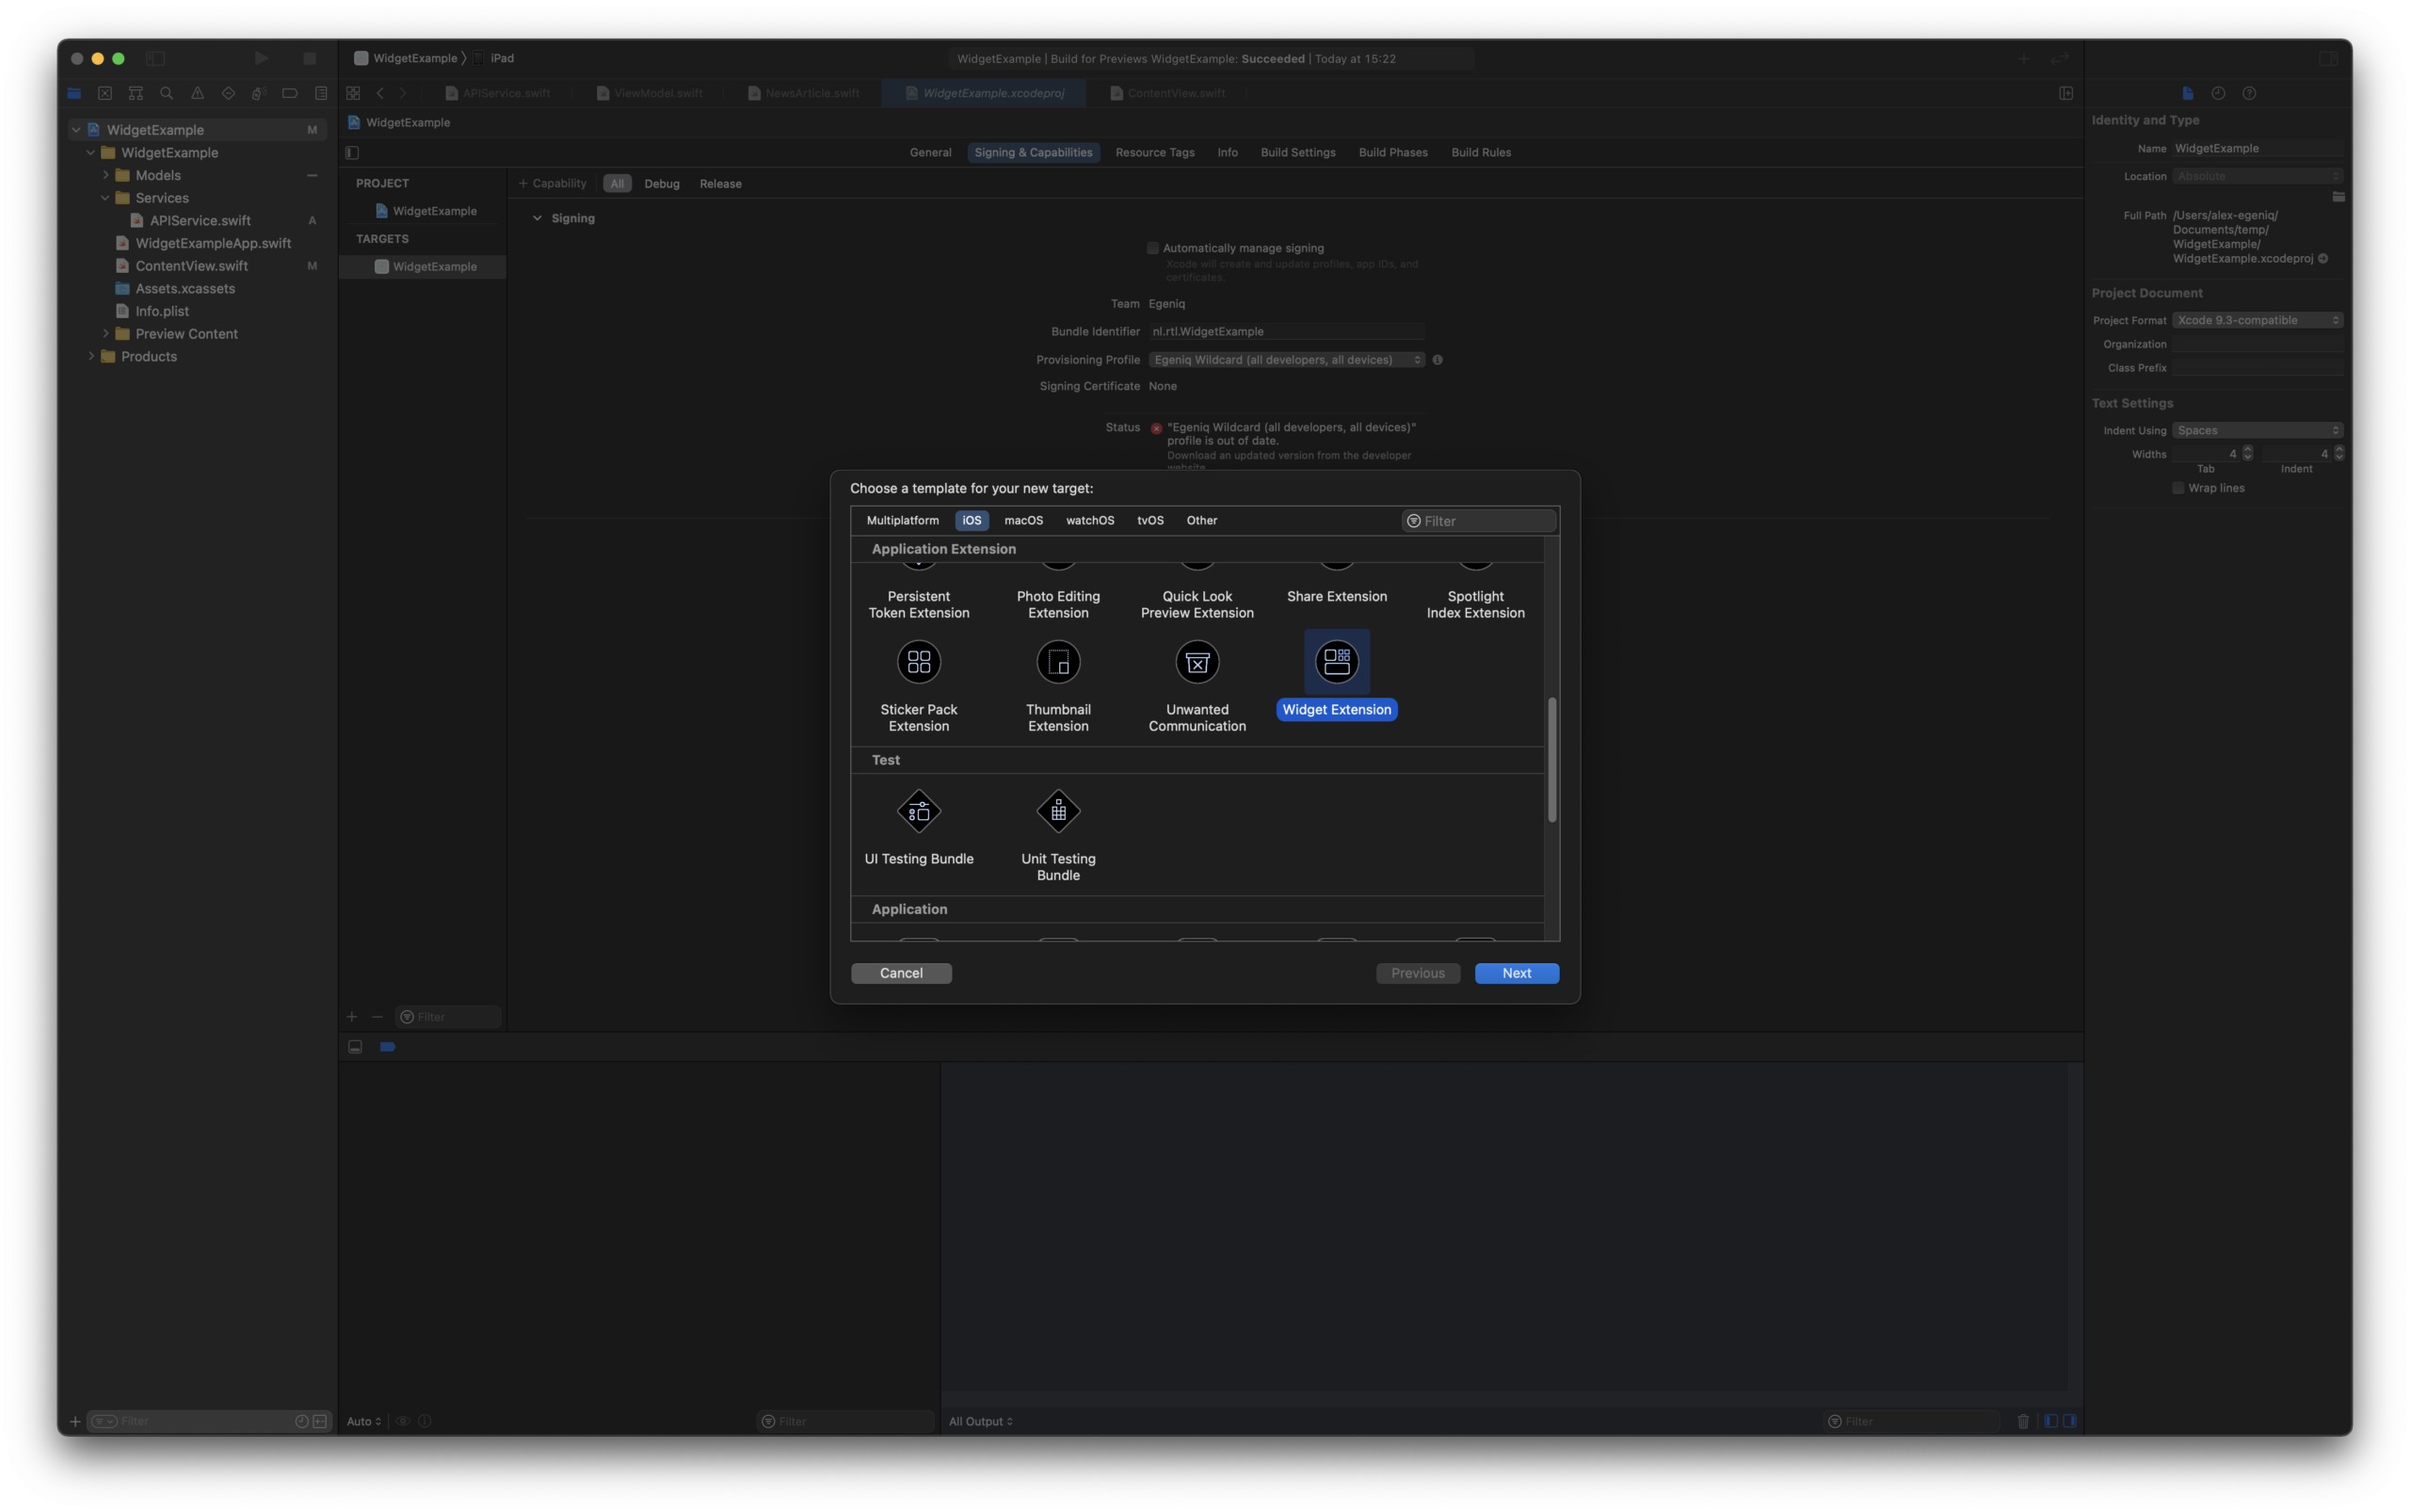
Go to targets and add the ‘Widget Extension’, give it a name and make sure to activate the scheme
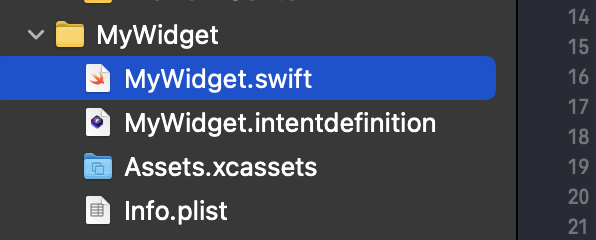
You will end up with a new directory in your project which contains the Widget classes you’ll need:
– The Widget main class (MyWidget.swift)
– IntentDefinition
– Info.plist
– Resources
widget files in swift
widget files in swift Dawn Technology
6.2
If you run the widget scheme, the simulator will now display a simple time widget.
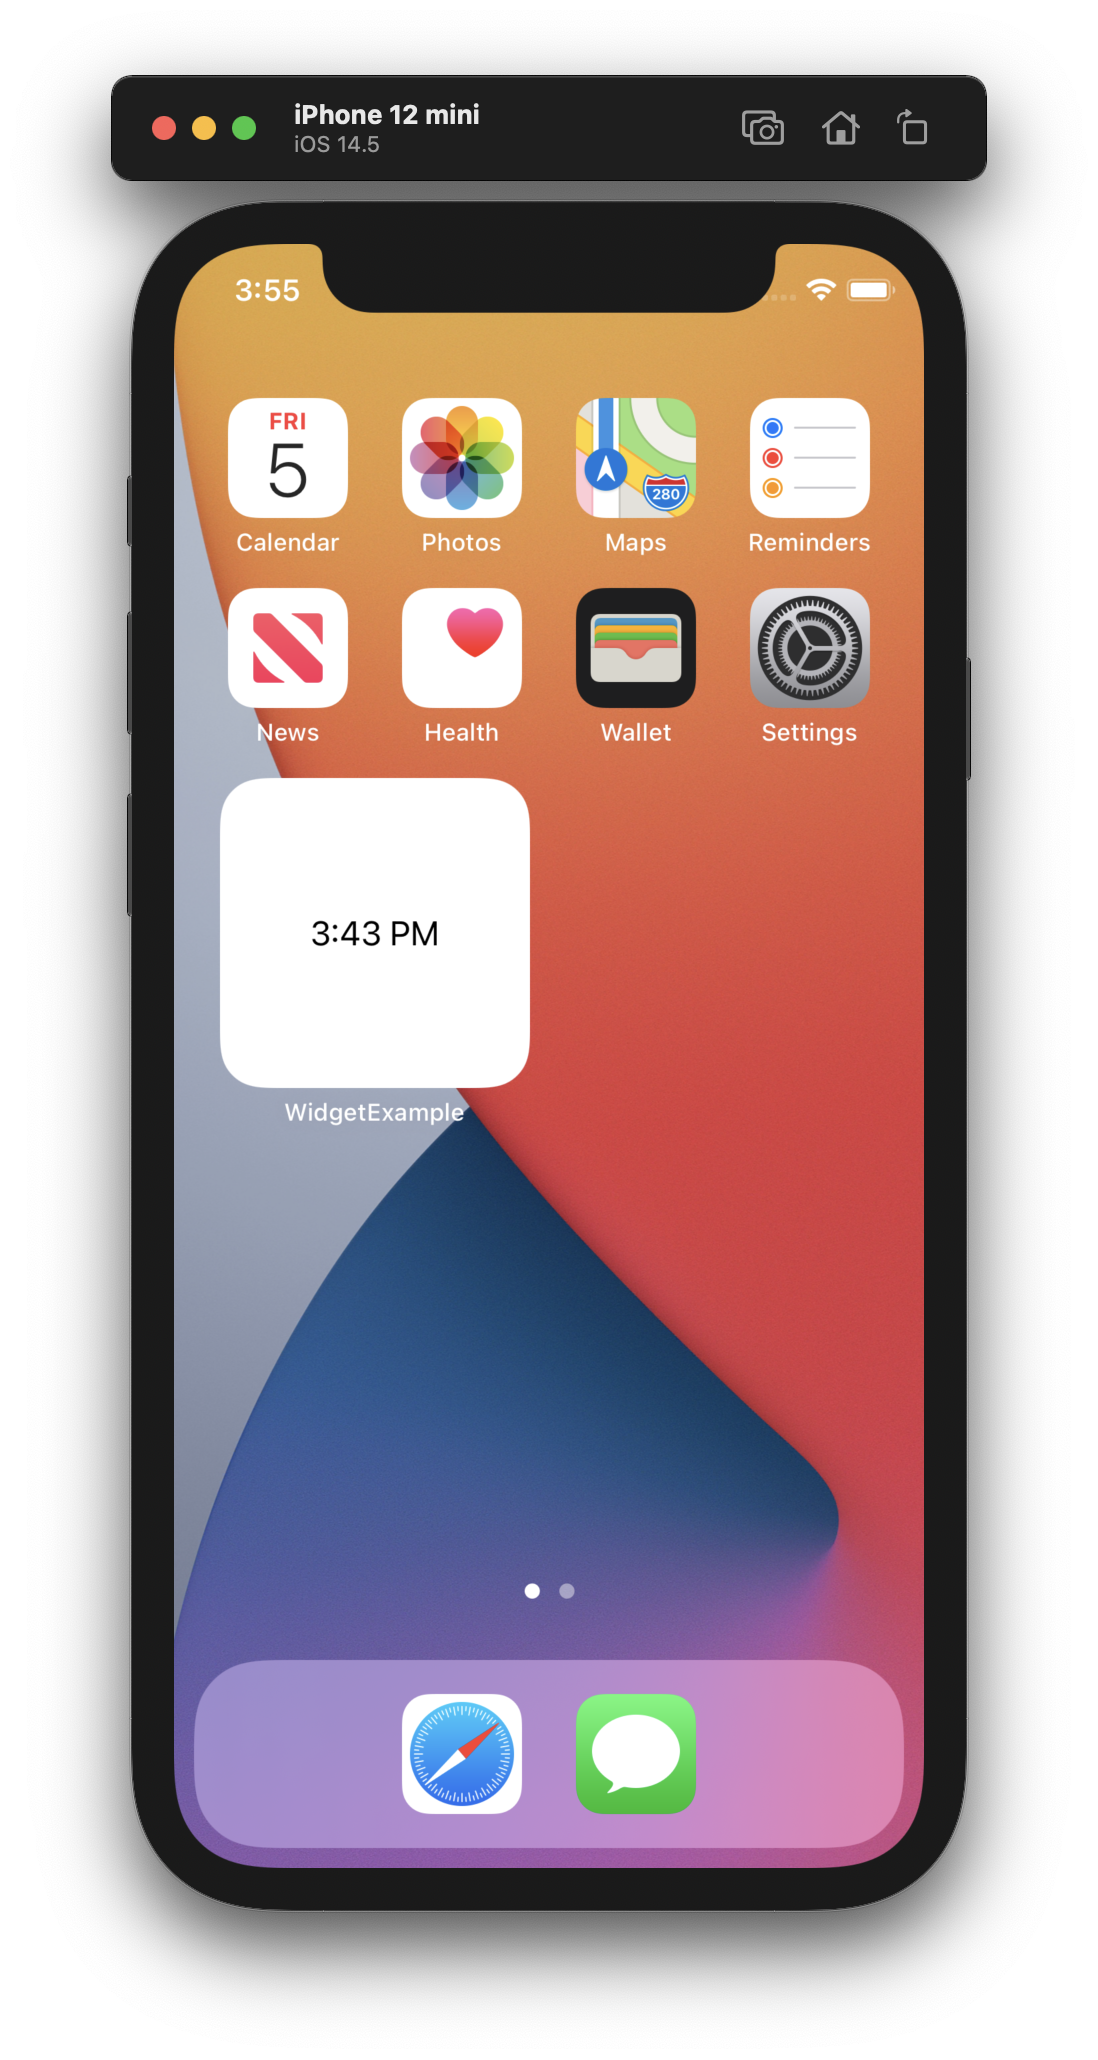
6.3
For now, we only need to check the main Widget Swift file. We will get back later to the IntentDefinition.
The widget code looks like this:
```swift
import WidgetKit
import SwiftUI
import Intents

struct Provider: IntentTimelineProvider {
    func placeholder(in context: Context) -> SimpleEntry {
        SimpleEntry(date: Date(), configuration: ConfigurationIntent())
    }

    func getSnapshot(for configuration: ConfigurationIntent, in context: Context, completion: @escaping (SimpleEntry) -> ()) {
        let entry = SimpleEntry(date: Date(), configuration: configuration)
        completion(entry)
    }

    func getTimeline(for configuration: ConfigurationIntent, in context: Context, completion: @escaping (Timeline<Entry>) -> ()) {
        var entries: [SimpleEntry] = []

        // Generate a timeline consisting of five entries an hour apart, starting from the current date.
        let currentDate = Date()
        for hourOffset in 0 ..< 5 {
            let entryDate = Calendar.current.date(byAdding: .hour, value: hourOffset, to: currentDate)!
            let entry = SimpleEntry(date: entryDate, configuration: configuration)
            entries.append(entry)
        }

        let timeline = Timeline(entries: entries, policy: .atEnd)
        completion(timeline)
    }
}

struct SimpleEntry: TimelineEntry {
    let date: Date
    let configuration: ConfigurationIntent
}

struct MyWidgetEntryView : View {
    var entry: Provider.Entry

    var body: some View {
        Text(entry.date, style: .time)
    }
}

@main
struct MyWidget: Widget {
    let kind: String = "MyWidget"

    var body: some WidgetConfiguration {
        IntentConfiguration(kind: kind, intent: ConfigurationIntent.self, provider: Provider()) { entry in
            MyWidgetEntryView(entry: entry)
        }
        .configurationDisplayName("My Widget")
        .description("This is an example widget.")
    }
}

struct MyWidget_Previews: PreviewProvider {
    static var previews: some View {
        MyWidgetEntryView(entry: SimpleEntry(date: Date(), configuration: ConfigurationIntent()))
            .previewContext(WidgetPreviewContext(family: .systemSmall))
    }
}
```
How do widgets work?
Widgets work using a timeline. The timeline is visible inside of the ‘Provider struct’.
The timeline can be best described as a card deck, in which iOS will just grab and display the next card on top and discard the previous card after a certain amount of time. Each item in the timeline object is an entry that contains data and a date. The data is the information displayed to the user and the date is the position on the timeline. The timeline also contains a refresh policy. This can be either ‘never’, ‘at the end’ when the widget has processed and displayed all the data on the timeline or after a ‘certain date’.
To display the timeline entry, there is an ‘entry-view’, which is the content.
Other methods such getSnapshot and placeholder are used for the iOS configuration flow or when displaying the widget in its initial state.
For our example we will use only one entry which will be a list of news article titles and we will refresh once every 15 minutes.
Configuring the widget to display news items
So in order to get our news data into the widget extension we will be needing to add the news classes to the widget extension.
For the following classes, go to the inspector and add the classes to the widget target.
– NewsArticle
– NewsArticleList
– ViewModel
– APIService
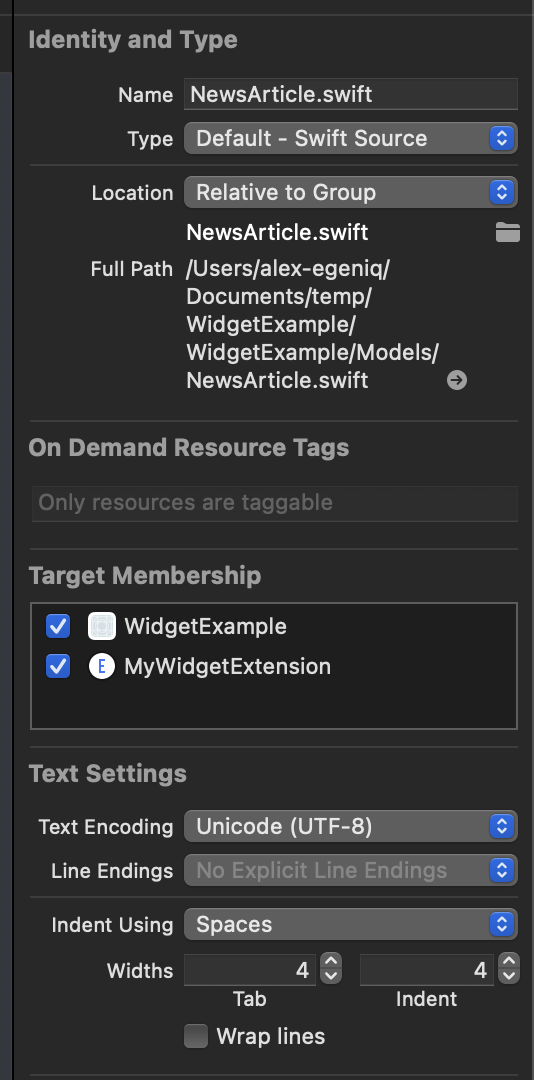
Now your app code is shared with the widget which allows us to use them in the widget.
Adjusting the news app classes
Since widgets are static and the OS is responsible for updating them, we cannot use ObservedObjects inside of them. We need to modify the ViewModel, so a widget is able to retrieve the data correctly.
Modify the ViewModel as follows:
```swift
final class ViewModel: ObservableObject {

    // MARK: - Constants
    private enum Constants {
      static let endpointString = "https://newsapi.org/v2/top-headlines?country=us&sortBy=publishedAt"
      static let apiKey = "<YOUR API KEY>"
    }

    // MARK: - properties
    enum Category: String {
        case general
        case business
        case entertainment
        case health
        case science
        case sports
        case technology
    }

    enum ResultState {
        case loading
        case error(Error)
        case success([NewsArticle])
    }

    private var cancelables: Set<AnyCancellable> = Set<AnyCancellable>()
    private let apiService: APIService

    @Published var state: ResultState = .loading

    // MARK: - init
    init(apiService: APIService = APIService() ) {
        self.apiService = apiService
    }

    // MARK: - get data
    func getDataIfNeeded(category: Category = .general, completion: ((Result<[NewsArticle], Error>) -> Void )? = nil ) {
        guard let url = getUrlForCategory(category: category) else {
            completion?(.failure(APIService.APIError.unknownError))
            return
        }

        state = .loading
        apiService.getObject(object: NewsArticleList.self, url: url)
            .subscribe(on: DispatchQueue.global(qos: .background))
            .receive(on: DispatchQueue.main)
            .sink { [weak self] result in
                switch result {
                case .failure(let error):
                    self?.state = .error(error)
                    completion?(.failure(error))
                default: break
                }

            } receiveValue: { [weak self] list in
                self?.state = .success(list.articles)
                completion?(.success(list.articles))
            }.store(in: &cancelables)
    }

    private func getUrlForCategory(category: Category = .general) -> URL? {
         var urlComponents = URLComponents(string: Constants.endpointString)
         var queryItems = urlComponents?.queryItems
         queryItems?.append(URLQueryItem(name: "category", value: category.rawValue))
         queryItems?.append(URLQueryItem(name: "apiKey", value: Constants.apiKey))
         urlComponents?.queryItems = queryItems

         return urlComponents?.url
    }

}
```
By adding a completion handler to getDataIfNeeded method, we should be able to get the data without observing a property.
Create the following struct for the NewsEntry.
```swift
struct NewsListEntry: TimelineEntry {
    enum State {
        case idle
        case error
        case success([NewsArticle])
    }

    let date: Date
    let state: State
}
```
This will be our entry which will be placed into the timeline. In general we have multiple states.
For the placeholder and the getSnapshot we will be using the idle state. This state is a neutral state when there isn’t any data downloaded yet.
The success state will be displaying the news articles and the error state will display an error in the widget when something went wrong.
Since widgets are static and relatively small, we also want to limit the number of articles to a maximum of 4.
Update the provider code to the following
```swift
struct Provider: IntentTimelineProvider {
    private let viewModel: ViewModel = ViewModel()

    func placeholder(in context: Context) -> NewsListEntry {
        NewsListEntry(date: Date(), state: .idle)
    }

    func getSnapshot(for configuration: ConfigurationIntent, in context: Context, completion: @escaping (NewsListEntry) -> ()) {
        let entry = NewsListEntry(date: Date(), state: .idle)
        completion(entry)
    }

    func getTimeline(for configuration: ConfigurationIntent, in context: Context, completion: @escaping (Timeline<Entry>) -> ()) {
        viewModel.reloadIfNeeded { result in
            var entries: [NewsListEntry] = []
            switch result {
            case .success(let newsItems):
                let items = Array(newsItems.prefix(4))
                entries.append(NewsListEntry(date: Date(), state: .success(items) ))
            case .failure:
                entries.append(NewsListEntry(date: Date(), state: .error))
                break
            }

            let timeline = Timeline(entries: entries, policy: .after(Date().addingTimeInterval(900))) // refresh once every 15 minutes
            completion(timeline)
        }

    }
}
```
As seen above, the viewModel has been added as an object and will retrieve the data set. As for placeholder and getSnapshot, both will set an idle state. Notice that in the timeline method, the articles will be limited to a max of 4 and that, when something goes wrong, an error entry will be injected. Also notice that the timeline refresh policy will update after 15 minutes.
Implementing the widget view
Modify the WidgetEntryView so it looks like this:
```swift
struct MyWidgetEntryView : View {
    var entry: NewsListEntry

    var body: some View {
        GeometryReader { geometry in

            switch entry.state {
            case .idle:
                Text("No data yet, waiting")
                    .font(.system(size: 12))
                    .frame(width: geometry.size.width, height: geometry.size.height, alignment: .center)
            case .error:
                Text("Oops something went wrong - please reconfigure!")
                    .font(.system(size: 12))
                    .frame(width: geometry.size.width, height: geometry.size.height, alignment: .center)

            case .success(let items):
                VStack {
                    Text("My News Widget")
                    Spacer()
                    ForEach(items, id:\.id) { item in
                            Text(item.title)
                                .frame(maxWidth: geometry.size.width, alignment: .leading)
                                .font(.system(size: 12))
                                .multilineTextAlignment(.leading)
                            Spacer()
                    }
                }
                .padding(10)
            }
        }

    }
}
```
9.1
Now the widget will render the news item as a list. It will also handle the different states of the entry.
However, this code will not run or render properly. The reason is that the text might be too large for the widget and we might want to support only one or two sizes. For this update the Main Widget Struct and the preview:
```swift
@main
struct MyWidget: Widget {
    let kind: String = "MyWidget"

    var body: some WidgetConfiguration {
        IntentConfiguration(kind: kind, intent: ConfigurationIntent.self, provider: Provider()) { entry in
            MyWidgetEntryView(entry: entry)
        }
        .configurationDisplayName("My Widget")
        .description("This is an example widget.")
        .supportedFamilies([.systemLarge]) // This will force the large widget layout
    }
}

struct MyWidget_Previews: PreviewProvider {
    static var previews: some View {
        MyWidgetEntryView(entry: NewsListEntry(date: Date(), state: .idle))
            .previewContext(WidgetPreviewContext(family: .systemLarge)) // This will force the large widget when in preview mode
    }
}
```
9.2
Build and run your widget extension project.
Congrats, you got your first simple widget working!
IntentDefinition adding widget configuration
Each widget has a backside which can be used to configure the widget. Setting this up is easy.
First open your MyWidget.intentdefinition. In the IntentDefinition edit screen, click on the small plus sign at the bottom left corner. Select enum and name it Category.
Now we are going to map the enum from our viewModel to the IntentDefinition, so we can apply a query filter to our widget.
Add the following cases to the enum:
– general
– business
– entertainment
– health
– science
– sports
– technology
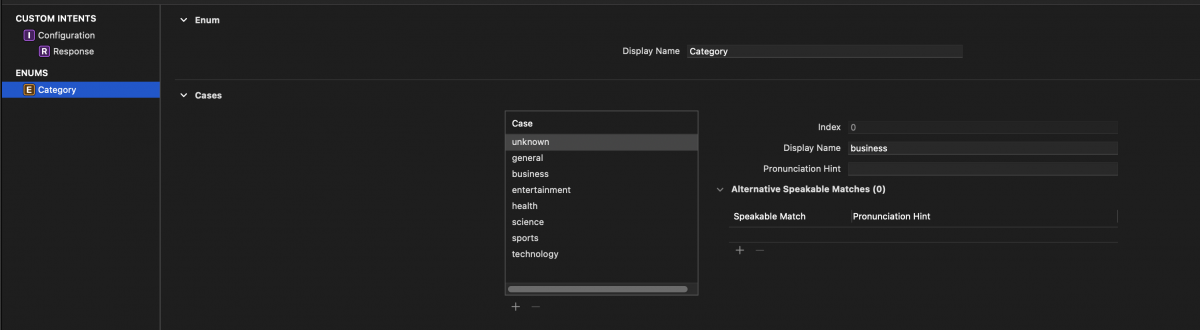
Great now we have an enum, but we also need to add it to the IntentDefinition as a property. For that, while on the IntentDefinition edit screen, click on configuration.
In the configuration screen of the IntentDefinition, add a property named category and make sure it uses the just created enum as a ‘Type’.
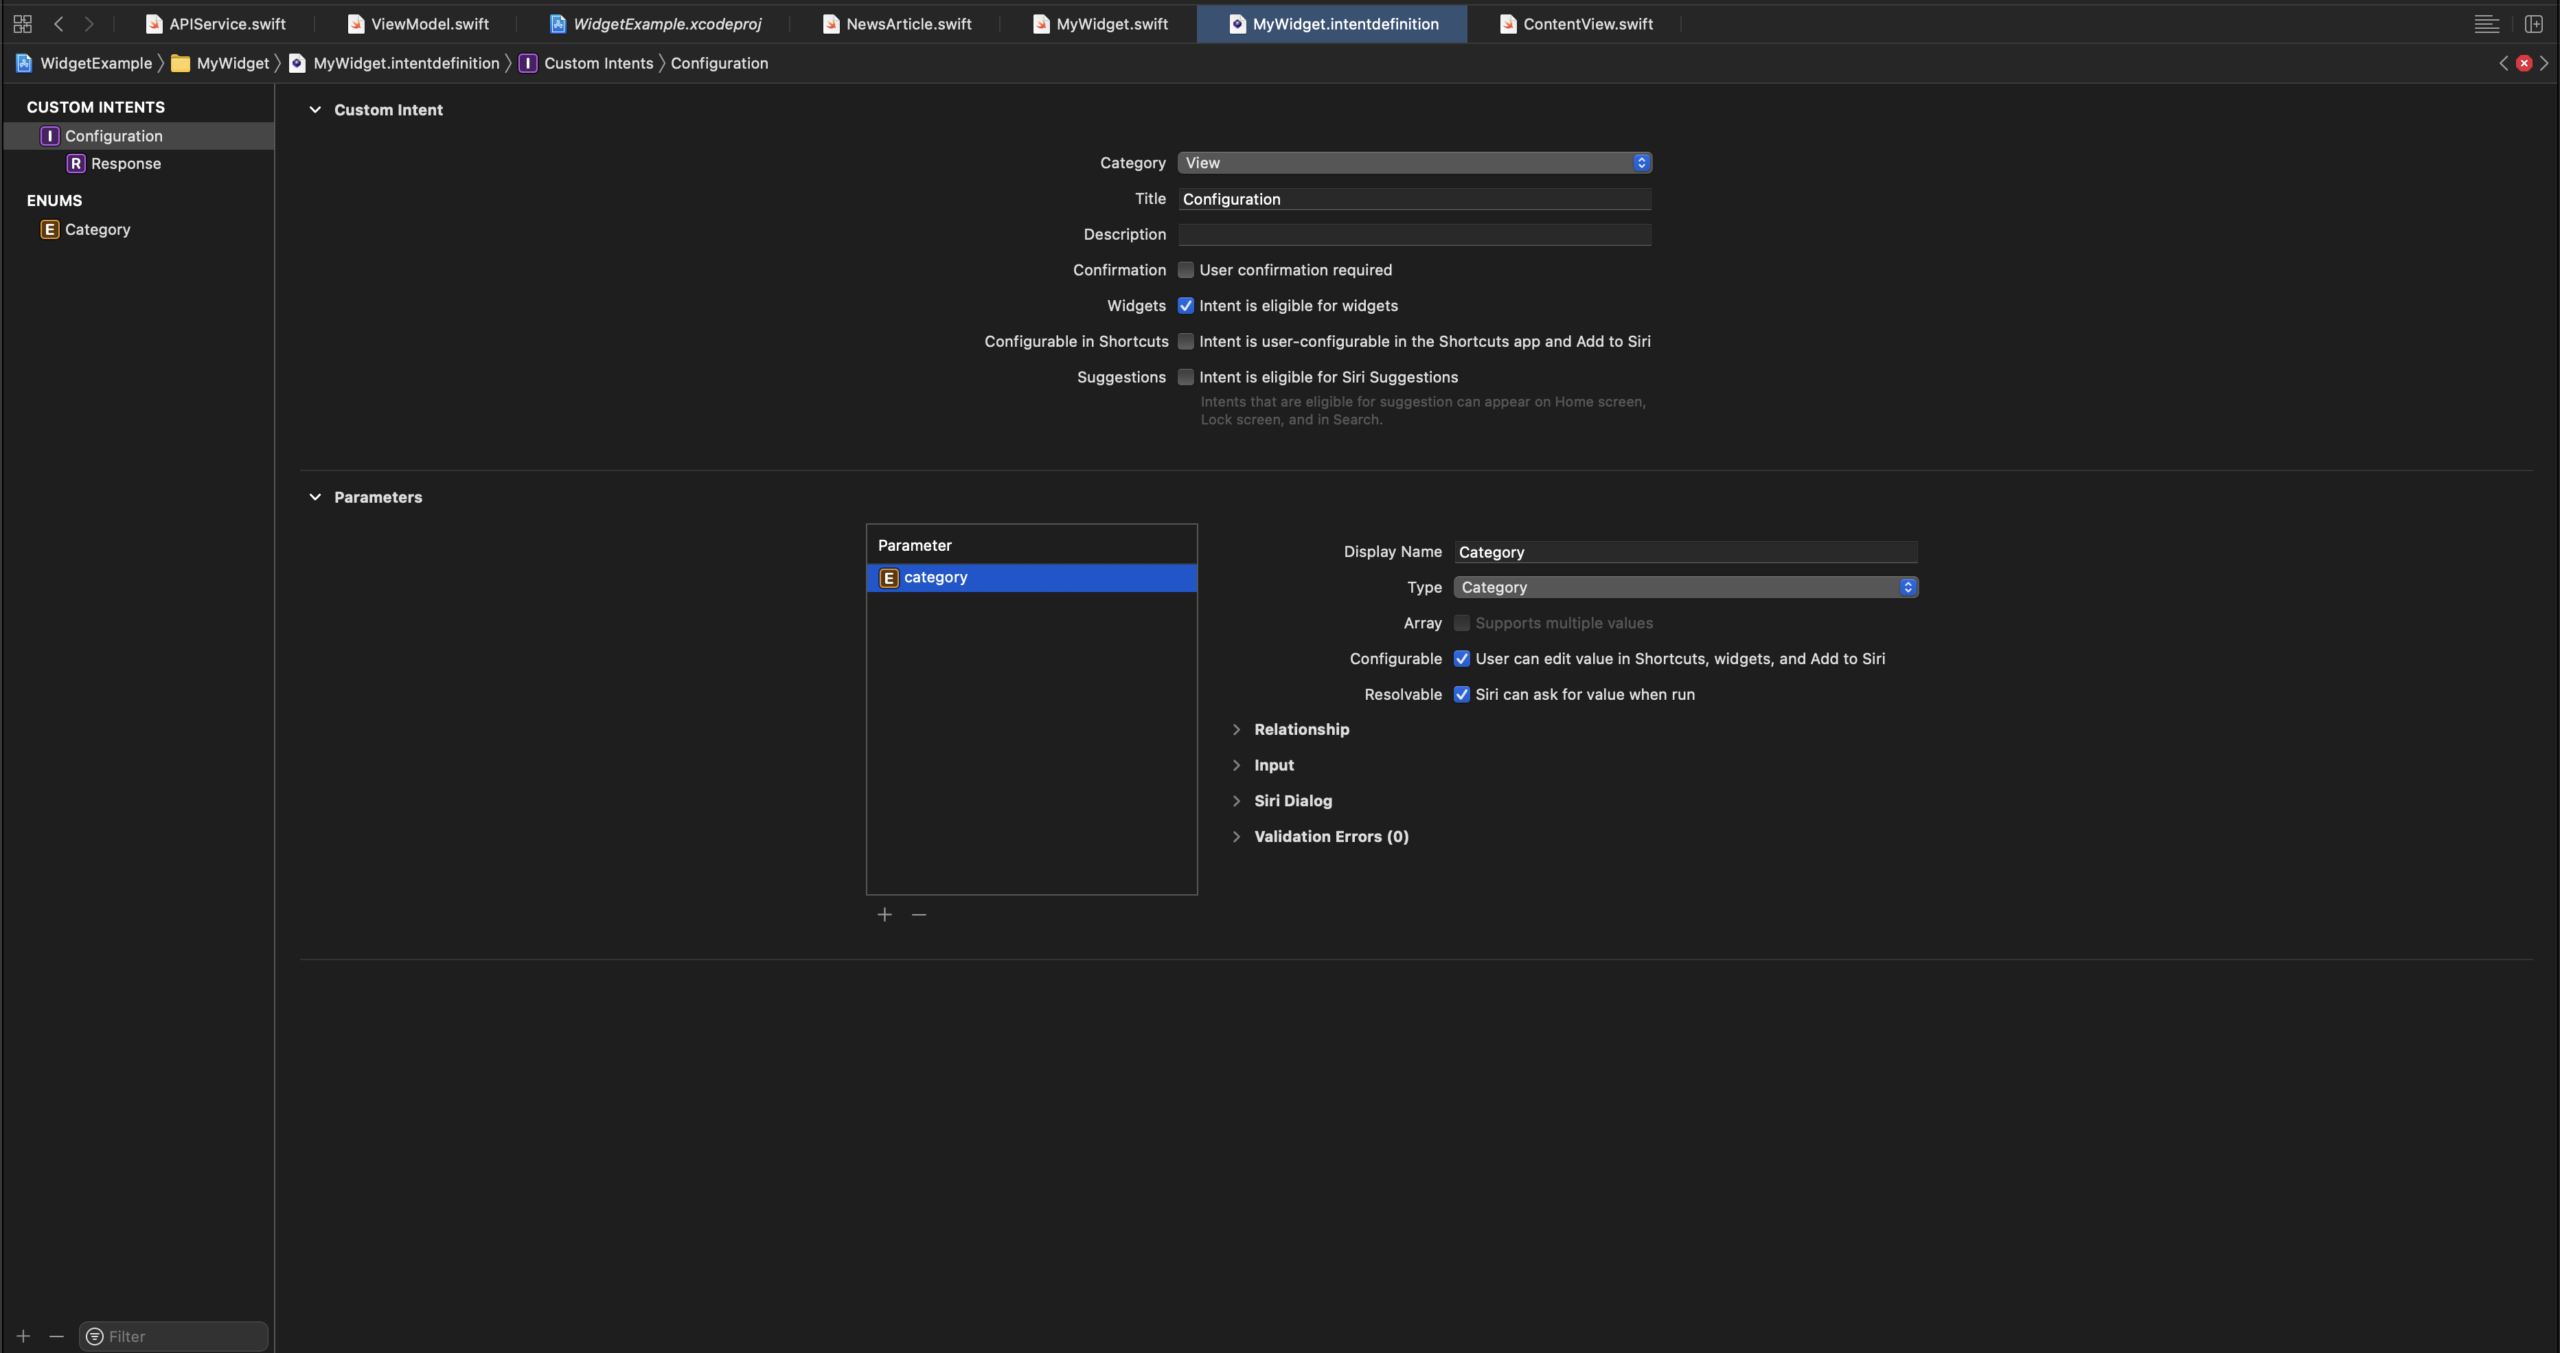
Now compile your app and widget by running build, but do not run it yet.
Now navigate to the getTimeline function of the IntentTimelineProvider class. Notice that the configuration (ConfigurationIntent) object has a new property, named category. Now this can be used as a filter for retrieving the data. Modify the timeline function so it looks like this:
```swift
func getTimeline(for configuration: ConfigurationIntent, in context: Context, completion: @escaping (Timeline<Entry>) -> ()) {

       var selectedCatagory: ViewModel.Category = .general

       // This switch statements will be used for mapping the categories
       switch configuration.category {
       case .business:
           selectedCatagory = .business
       case .entertainment:
           selectedCatagory = .entertainment
       case .health:
           selectedCatagory = .health
       case .science:
           selectedCatagory = .science
       case .sports:
           selectedCatagory = .sports
       case .technology:
           selectedCatagory = .technology
       default: break
       }

       viewModel.getDataIfNeeded(category: selectedCatagory) { result in
           var entries: [NewsListEntry] = []
           switch result {
           case .success(let newsItems):
               let items = Array(newsItems.prefix(4))
               entries.append(NewsListEntry(date: Date(), state: .success(items) ))
           case .failure:
               entries.append(NewsListEntry(date: Date(), state: .error))
               break
           }

           let timeline = Timeline(entries: entries, policy: .after(Date().addingTimeInterval(900)))
           completion(timeline)
       }

   }
```
Now the timeline will get the news items using a filter.
To test this, build and run the app and widget.
When the widget appears, long press it and select edit.
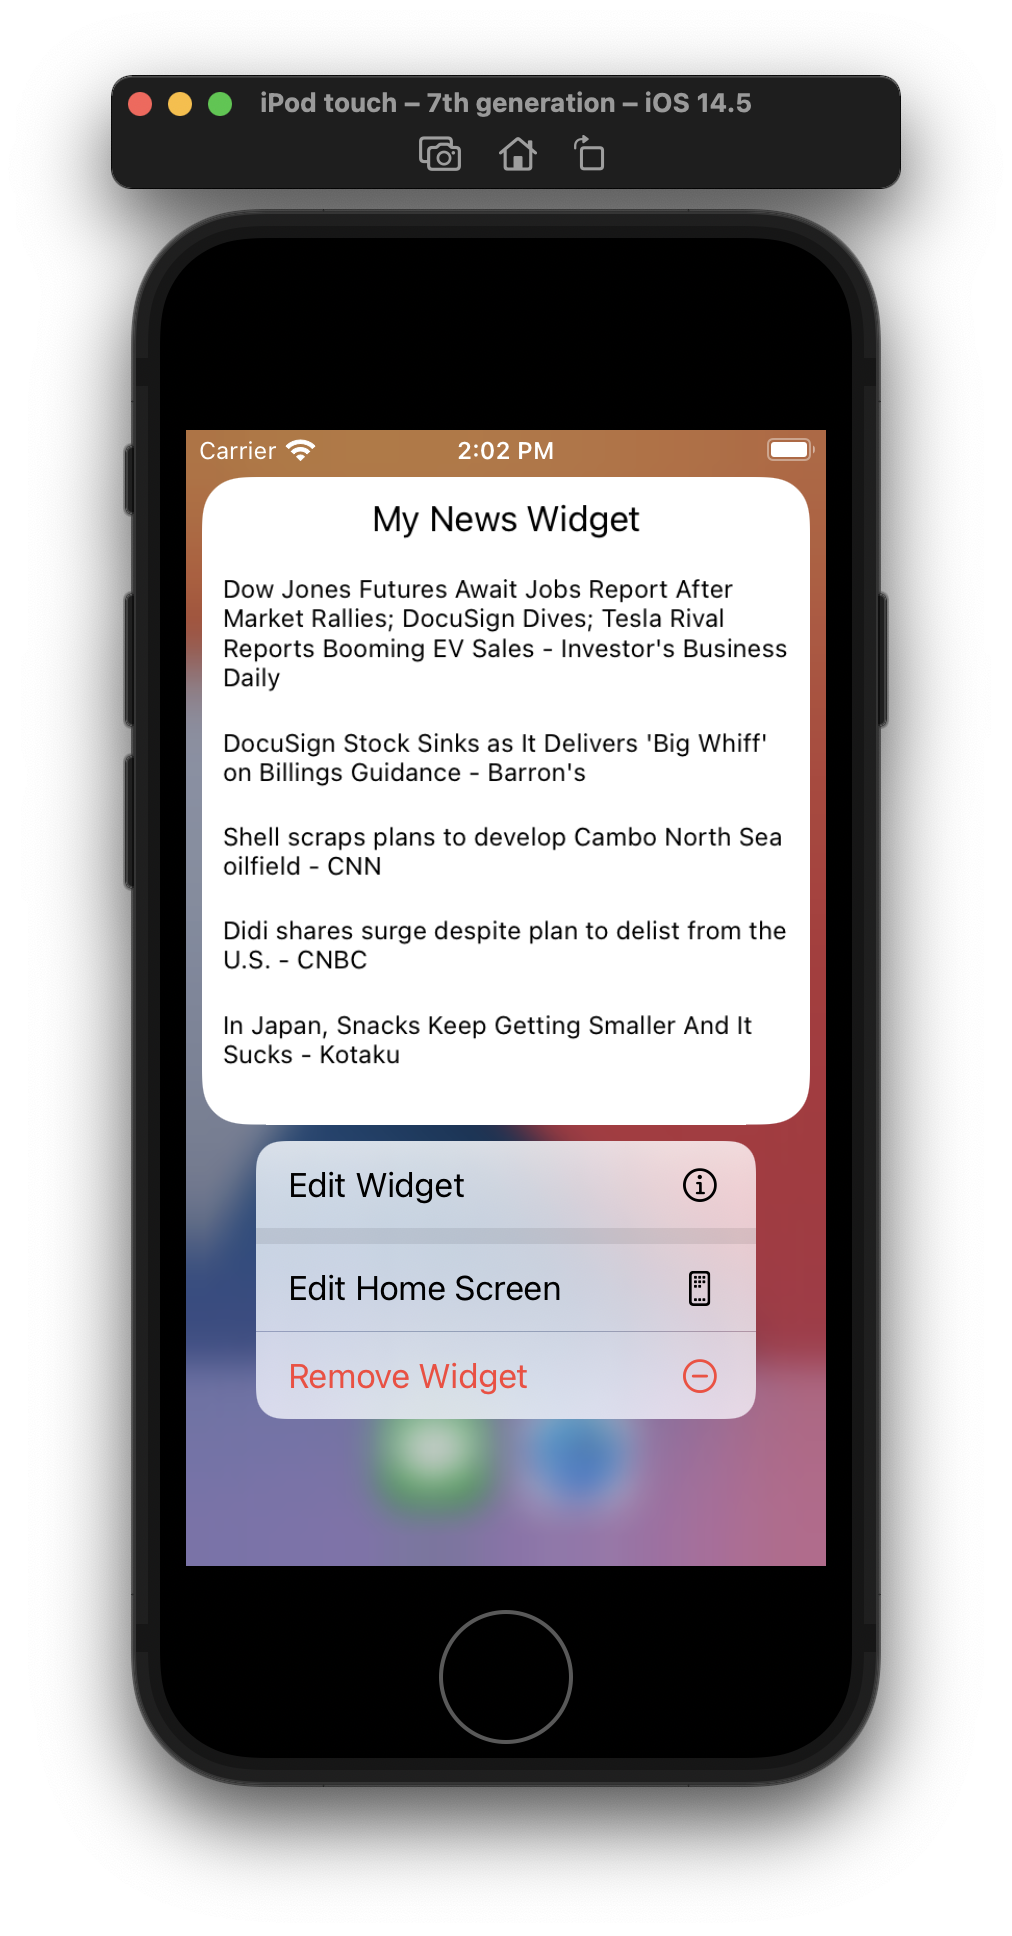
Notice that it will flip and display a button in which you can select something.
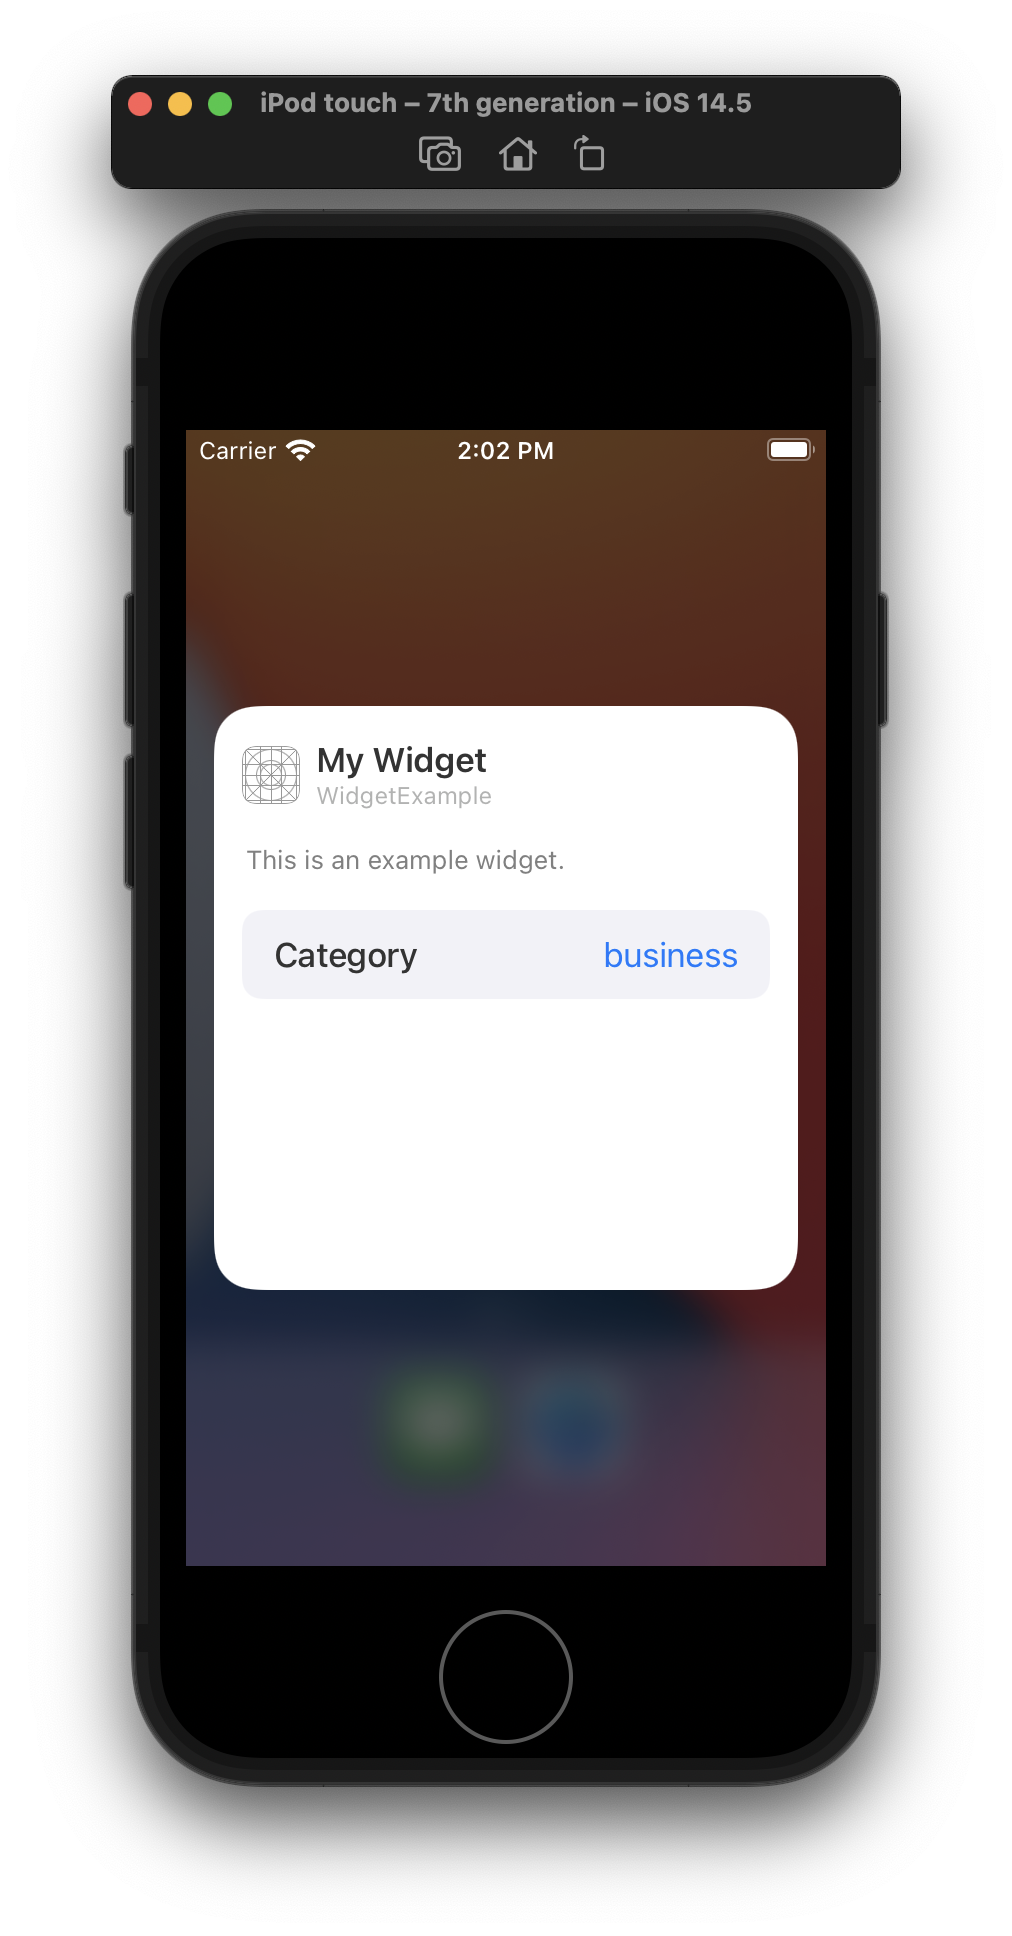
Select a category and tap outside the widget. Notice that the widget will retrieve a different dataset based on the filtering you selected.
Finally, lets style the widget a little bit.
Styling the widget
Our widget looks a bit boring, so let’s improve a couple of things. Add the following struct to the widget extension project.
```swift
struct NetworkImageView: View {
    // MARK: - properties
    let url: URL?

    private enum Constants {
        static let size = CGSize(width: 50, height: 50)
    }

    var body: some View {
        Group {
            if let url = url, let imageData = try? Data(contentsOf: url), let image = UIImage(data: imageData) {
                ZStack {
                    Image(uiImage: image)
                        .resizable()
                        .aspectRatio(contentMode: .fill)
                        .frame(width: Constants.size.width, height: Constants.size.height)
                }
                .cornerRadius(0)
                .frame(width: Constants.size.width, height: Constants.size.height)
            } else {
                ZStack {
                    Text("No image")
                        .font(.caption)
                        .foregroundColor(.gray)
                        .frame(width: Constants.size.width, height: Constants.size.height)
                }
                .background(Color.black)
            }
        }
    }

}
```
This view will handle the downloading of the images. As widgets do not support async downloaded images, you need to create something custom. This struct is one way of downloading the images.
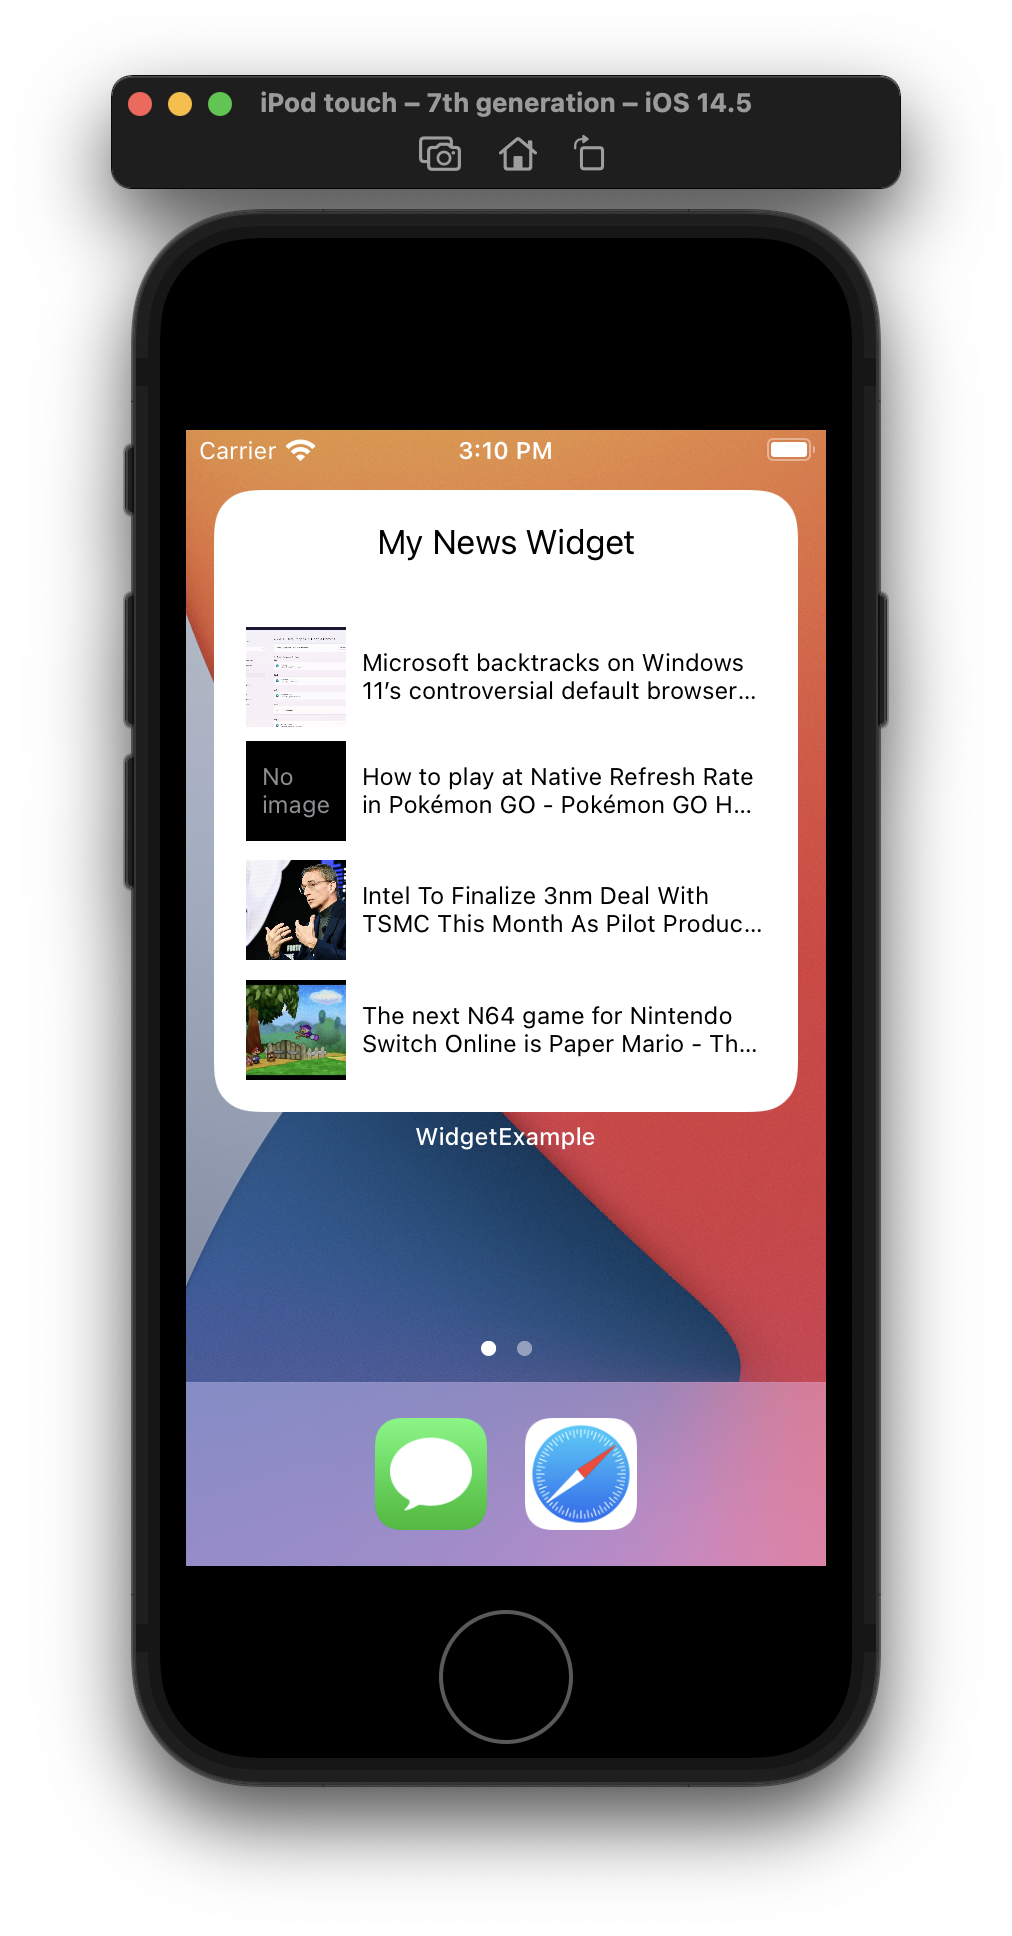
What will happen in this struct is that the NetworkImageView will try to download the image data if the url is valid. After that it will display the image in an ImageView. If this fails it will display a ‘No Image’-text.
Adjust the entry view so it looks like this:
```swift
struct MyWidgetEntryView : View {
    var entry: NewsListEntry

    var body: some View {
        GeometryReader { geometry in

            switch entry.state {
            case .idle:
                Text("No data yet, waiting")
                    .font(.system(size: 12))
                    .frame(width: geometry.size.width, height: geometry.size.height, alignment: .center)
            case .error:
                Text("Oops something went wrong - please reconfigure!")
                    .font(.system(size: 12))
                    .frame(width: geometry.size.width, height: geometry.size.height, alignment: .center)

            case .success(let items):
                VStack {
                    Text("My News Widget")
                    Spacer()
                    ForEach(items, id:\.id) { item in
                        HStack {
                            NetworkImageView(url: URL(string: item.urlToImage ?? ""))
                            Text(item.title)
                                .lineLimit(2)
                                .truncationMode(.tail)
                                .frame(maxWidth: geometry.size.width, alignment: .leading)
                                .font(.system(size: 12))
                                .multilineTextAlignment(.leading)
                        }

                    }
                }
                .padding()
            }
        }

    }
}
```
Compile and run your widget to see the result. It should display an image and a title which have been limited to 2 lines per news entry.
Congrats! This is your first widget!
Build Your Widget the Right Way
We ship SwiftUI + WidgetKit that stays fast, reliable, and on-brand. Tell us what you need.